

Introduction
Overview of JavaScript ES6
Welcome to the world of JavaScript ES6 – the sleek upgrade we’ve all been yearning for since the dawn of time (or maybe just since ES5). Also known as ECMAScript 2015, ES6 brings a treasure trove of features that make coding in JavaScript less of a headache and more of a cozy caffeine-fueled joyride. Think of it as your new favorite Swiss Army knife, flaunting functionalities you never knew you needed!
Importance of Learning ES6 Features
Now, why should you invest your precious time learning these shiny new features? Because, frankly, not knowing ES6 is like showing up to a gunfight with a rubber band. Here’s why you should dive in:
- Improved Readability: ES6 syntax provides clearer and more concise code.
- Enhanced Functionality: From arrow functions to destructuring, the features streamline your workflow.
- Better Performance: Some features optimize execution speed, making your applications snappier.
So, let’s roll up our sleeves and start this journey into The Ultimate Guide to JavaScript ES6 Features!

Var, Let, and Const
Exploring Variable Declarations
Alright, folks, let’s dive into the delightful realm of variable declarations. If you’ve ever been confused about how to declare a variable without feeling like you’re playing a game of whack-a-mole, you’re in luck! In JavaScript, you’re greeted by three delightful keywords: var, let, and const. Each comes with its own quirky personality, which we’re about to unravel together.
Differences Between Var, Let, and Const
Now, you might be wondering: “Why so many ways to declare a variable?” Well, each has a unique role in the code-crunching cosmos.
var: The grandparent of variable declarations,varhas been around since the dawn of JavaScript. It’s function-scoped, meaning if you declare it inside a function, it’s stuck in there like a kid in a candy store.let: Enterlet, the cool, modern kid on the block! It’s block-scoped, which means it knows when to sit down and behave. Declare it inside a block (like an if-statement) and it won’t wander out.const: Last but not least isconst, the wise old sage that refuses to change. Once you assign a value to aconst, it’s sticking around forever (unless it’s a mutable object, but let’s not complicate things).
Understanding these differences can save you from a coding headache down the line, so choose wisely!

Arrow Functions
Syntax and Benefits of Arrow Functions
Now that we’ve untangled the mystery of variable declarations, let’s zip over to arrow functions – the suave newcomers in the JavaScript scene. The syntax is so sleek that it makes you feel like a coding rockstar just typing it out. Instead of a traditional function declaration, you can whip up an arrow function with this tidy snippet:
const greet = (name) => `Hello, ${name}!`;Benefits? Oh, let me count the ways:
- Conciseness: Fewer lines of code are needed, which means you can finish that project before the coffee runs out.
- No
thisBinding: Arrow functions don’t bind their ownthis, which means you can stop worrying about scope when passing around functions.
Usage and Caveats of Arrow Functions
But don’t get too cozy just yet, pals! Arrow functions have their quirks. They shine in many scenarios, especially when using callbacks or when dealing with methods like map() or filter().
For instance, say you’re filtering an array:
const numbers = [1, 2, 3, 4];

const squares = numbers.map(num => num * num);
However, beware of their limitations:
- No Arguments Object: They don’t have their own
arguments, which can lead to confusion. - Not Suitable for Methods: If you need the
thiscontext (think class methods), stick to regular functions.
So, make sure you’re wielding this tool wisely in your coding toolbox!

Template Literals
Creating Dynamic Strings with Template Literals
Now that we’re cruising along with arrow functions, let’s take a pit stop at template literals – a feature that makes string manipulation feel like a gentle breeze on a sunny day. You might wonder how we survived without them, right? To create dynamic strings in ES6, all you need to do is use backticks (`) instead of the usual single or double quotes.
For example, instead of the clunky method of string concatenation:
const name = 'Alice';

const greeting = 'Hello, ' + name + '!';
You can simply do:
const greeting = `Hello, ${name}!`;Boom! Instant readability.
Interpolation and Tagged Templates
But hold your horses; there’s more! With template literals, interpolation becomes a breeze. You can easily insert variables or even expressions right into your strings. Need to calculate the area of a rectangle while stringing it along? Check it out:
const length = 5;

const width = 10;

const areaMessage = `The area is ${length * width} square units.`;
Now, let’s talk about tagged templates. They’re like giving your strings a VIP pass, allowing you to parse template literals in a custom way. Imagine having a function that processes your strings before they go live:
function tag(strings, ...values) {

    return strings.reduce((acc, str, i) => `${acc}${str}${values[i] || ''}`, '');

}

const name = 'Alice';

const taggedMessage = tag`Congratulations ${name}, you’ve won!`;
This advanced feature provides limitless possibilities for manipulating strings. With template literals at your fingertips, you’ll wonder how you ever coded without them!
Destructuring Assignment
Understanding Destructuring Objects
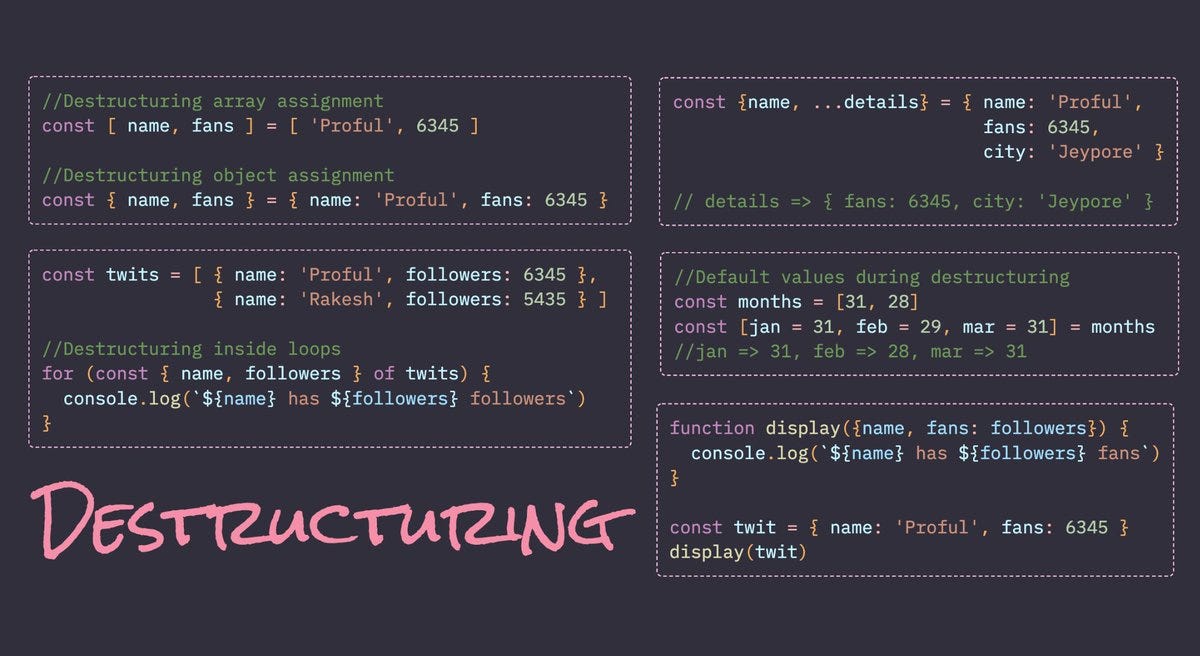
Fresh from our exploration of template literals, let’s dive into destructuring assignment – a feature that feels straight out of a wizard’s spellbook. Imagine you’ve got an object, perhaps a user profile, and you want to pluck certain values from it without the fuss of traditional syntax. With destructuring, you can elegantly extract values in one fell swoop:
const user = { name: 'Alice', age: 30, location: 'Wonderland' };

const { name, age } = user;
Just like that, name and age are now variables ready to shine in your code!
Destructuring Arrays and Nested Objects
Feeling fancy? Destructuring works its magic on arrays too! Let’s say you have an array of colors:
const colors = ['red', 'green', 'blue'];

const [firstColor, secondColor] = colors;
Now you have firstColor and secondColor without the clunky indexing!
But wait, there’s more! Nested objects are child’s play with destructuring. Let’s say you have a user object with an address:
const user = {

    name: 'Alice',

    address: { city: 'Wonderland', zip: '12345' }

};

const { address: { city } } = user;
Just like that, city is extracted effortlessly. Destructuring not only cuts down on code but also enhances readability, making your code more approachable. So say goodbye to endless point notation and hello to this delightful syntax!

Spread and Rest Operators
Utilizing Spread Operator for Arrays
Now that we’ve stripped down destructuring, let’s pile on some extra flair with the spread operator! This little gem allows you to expand elements from arrays or objects seamlessly. Imagine you’ve whipped up two arrays and you want to merge them into one glistening array. Instead of the old-fashioned method, just sprinkle some spread magic like so:
const fruits = ['apple', 'banana'];

const veggies = ['carrot', 'spinach'];

const combined = [...fruits, ...veggies];
Voilà! combined now contains all your fruity and veggie goodness. It’s like combining your two favorite playlists into one, without a hitch!
Rest Parameter Syntax and Usage
Now, let’s not forget about the rest parameter syntax – the loving cousin of the spread operator. It captures multiple elements and condenses them into a single array. This is particularly handy when you’re dealing with functions that don’t know in advance how many arguments they’re going to receive.
For instance:
function sum(...numbers) {

    return numbers.reduce((acc, num) => acc + num, 0);

}
With the rest parameter, you can sum up any set of numbers without breaking a sweat! Whether you’re gathering inputs or merging arrays, the rest parameter keeps your code neat and functional. So go ahead and wield these operators like a pro, because they’re here to make your coding life easier!

Promises
Introduction to Promises in JavaScript
Shifting gears from rest parameters, let’s unravel the enchanting world of promises in JavaScript. If you’ve ever tackled asynchronous operations, you know the frustration of callbacks leading to “callback hell.” Enter the promise, a beautiful concept that helps you manage asynchronous behavior with grace. Essentially, a promise is an object that represents a future value – it can be in one of three states: pending, fulfilled, or rejected.
For instance, consider a scenario where you’re fetching data from an API:
const fetchData = () => new Promise((resolve, reject) => {

    // Simulate API call

    setTimeout(() => resolve('Data received!'), 2000);

});
Now, you have a way to handle data when it finally arrives!
Chaining and Error Handling with Promises
What’s even cooler? Promises support chaining, allowing you to write cleaner code. When one promise resolves, you can easily tap into the next method:
fetchData()

    .then(data => console.log(data))

    .catch(error => console.error('Error:', error));
With .then(), you get to seamlessly work with the resolved value, while .catch() swoops in to handle any errors. It’s like having a safety net in your asynchronously flying circus act!
To sum it up, promises are your new best friend in dealing with async operations. They make your life easier and your code more readable. So embrace promises and wave goodbye to the callback chaos!

Modules
Exploring ES6 Modules
Having navigated the realm of promises, let’s hop onto the module train! ES6 modules are the tidy solution to organizing your code. Remember those days of cramming everything into a single file? With modules, you can separate concerns and create a clear structure that makes your codebase cleaner and more maintainable. Each module can export functionality, which can then be imported into other modules, making it like trading Pokémon cards – each one offers unique powers!
Import and Export Statements
Now, let’s get down to the nitty-gritty of import and export statements. Think of export as sending a care package filled with functions, objects, or variables from one module:
// In math.js

export const add = (a, b) => a + b;
And then, in another file, you can easily import that delightful package:
import { add } from './math.js';

console.log(add(2, 3)); // Outputs: 5
You can also use default exports for a single export per module:
// In myFunction.js

const myFunction = () => /* do something */;

export default myFunction;
In the importing file:
import myFunction from './myFunction.js';This structure not only adds clarity but enhances code reusability. So, embrace the modular approach and give your code the organization it deserves!

Classes
Creating Objects with ES6 Classes
After our jaunt through the world of modules, let’s wade into the exciting territory of ES6 classes! If you’ve ever felt overwhelmed by the prototypal inheritance in JavaScript, fear not. Classes provide a cleaner and more intuitive syntax for creating objects. They simplify object-oriented programming, allowing us to define a blueprint and make new instances with ease.
For instance, here’s how you create a class called Car:
class Car {

    constructor(make, model) {

        this.make = make;

        this.model = model;

    }

    displayInfo() {

        console.log(`This car is a ${this.make} ${this.model}.`);

    }

}
You can then create a new instance like so:
const myCar = new Car('Tesla', 'Model S');

myCar.displayInfo(); // Outputs: This car is a Tesla Model S.
Inheritance and Static Methods in Classes
But wait, there’s more magic inside the class cauldron! Inheritance allows one class to inherit properties from another, promoting code reuse. Imagine you have a ElectricCar class that extends Car:
class ElectricCar extends Car {

    constructor(make, model, battery) {

        super(make, model);

        this.battery = battery;

    }

    displayBatteryInfo() {

        console.log(`This electric car has a ${this.battery} battery.`);

    }

}
You can even create static methods that belong to the class itself rather than any instance:
class Car {

    static numberOfWheels() {

        return 4;

    }

}

console.log(Car.numberOfWheels()); // Outputs: 4
With classes, you not only structure your code better but also make it easy to maintain and extend. It’s a true game-changer in the JavaScript toolbox!

Iterators and Generators
Overview of Iterators in ES6
Now that we’ve embarked on the class journey, let’s pivot to iterators and generators, the unsung heroes of JavaScript’s iteration protocol. An iterator is simply an object that facilitates iterating over data structures like arrays, strings, or even custom data types. How does it work, you ask? It has a method called .next() that returns the next value in a sequence, along with a boolean indicating if the end has been reached.
For instance, consider this array of numbers:
const numbers = [1, 2, 3];

const iterator = numbers[Symbol.iterator]();

console.log(iterator.next()); // { value: 1, done: false }

console.log(iterator.next()); // { value: 2, done: false }
You get to peek into that array, one element at a time!
Generator Functions and Yield Keyword
Now, let’s sprinkle some extra magic with generator functions, which make creating iterators a breeze. A generator function is defined with an asterisk (*) and can yield multiple values throughout its execution without blocking the main thread. The yield keyword is what makes everything delightful; it pauses the function and remembers its state for the next time it’s called.
Here’s a taste of generator goodness:
function* numberGenerator() {

    yield 1;

    yield 2;

    yield 3;

}

const gen = numberGenerator();

console.log(gen.next()); // { value: 1, done: false }

console.log(gen.next()); // { value: 2, done: false }
With yield, you can create custom sequences that are easy to manage and use. It’s like crafting your own adventure story, allowing you to return to specific points at will. Utilizing iterators and generators enhances your coding flexibility, making your scripts more powerful and engaging!

Sets and Maps
Working with Sets in JavaScript
After enjoying our escapade with iterators and generators, let’s take a detour into the fascinating realm of sets and maps in JavaScript. First off, sets are like exclusive clubs where each member (value) must be unique. They provide an elegant way to manage collections without duplicates. For example, if you’re keeping track of visitors to a website, using a set ensures no one sneaks in twice:
const visitors = new Set();

visitors.add('Alice');

visitors.add('Bob');

visitors.add('Alice'); // Won't add a duplicate

console.log(visitors); // Outputs: Set { 'Alice', 'Bob' }
Ah, the joy of straightforward membership!
Understanding Map Objects
Now, let’s swing over to map objects, which are essentially dictionaries or hash tables that allow you to store pairs of keys and values. This is incredibly handy when you want to associate specific values with unique keys.
For instance, imagine you’re tracking the scores of players in a game:
const scores = new Map();

scores.set('Alice', 100);

scores.set('Bob', 150);

console.log(scores.get('Alice')); // Outputs: 100
You can also check the existence of a key or delete entries without breaking a sweat. Maps not only preserve the order of insertion, but they also provide efficient ways to retrieve values based on their keys. Together, sets and maps bring a powerful toolkit to your JavaScript arsenal, perfect for when you need to manage data with finesse!

XII. Conclusion
Benefits of Using ES6 Features
As we wrap up our journey through The Ultimate Guide to JavaScript ES6 Features, let’s take a moment to appreciate the myriad benefits that come with embracing ES6. These features not only promote cleaner and more maintainable code but also enhance productivity. Here’s a quick recap of why you should hop on the ES6 train:
- Increased Readability: With features like template literals and destructuring, your code becomes far more intuitive.
- Improved Functionality: With promises, async behavior is easier to handle, and classes streamline object-oriented programming.
- Modular Structure: ES6 modules facilitate better organization and separation of concerns, making collaboration smoother.
Further Learning Resources
Curious to dive deeper? You’re in luck! Here are some fantastic resources to fuel your ES6 learning:
- MDN Web Docs: A treasure trove of articles on ES6 features.
- JavaScript.info: Comprehensive tutorials with practical exercises.
- Books: Titles like “You Don’t Know JS” series by Kyle Simpson.
Equipped with this knowledge, you’re ready to conquer JavaScript with flair. Happy coding, and may your lines of code overflow with elegance!
