1850660191.jpg "172103935033304-71850660191.jpg")

Introduction
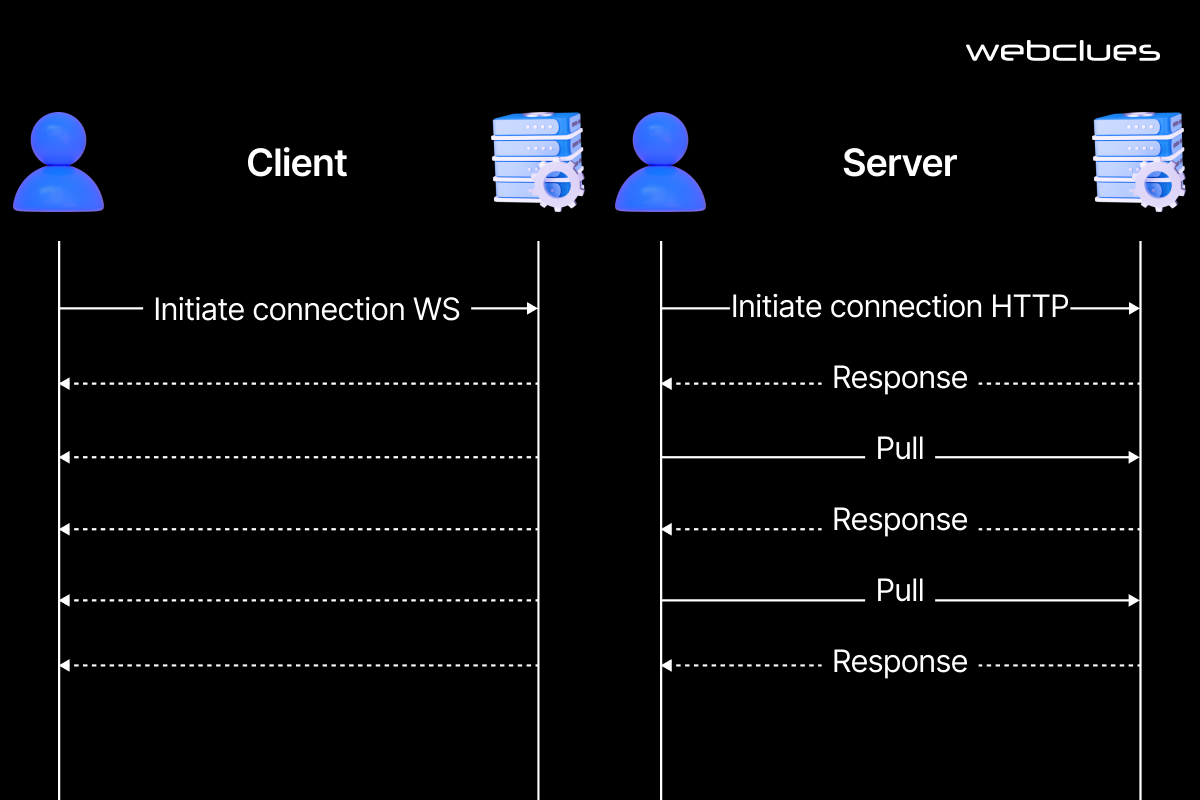
What are WebSockets?
WebSockets represent a powerful technology that allows for full-duplex communication channels over a single TCP connection. Unlike the traditional HTTP request-response model, which can be limiting for interactive applications, WebSockets maintain an open connection that enables real-time data exchange between the client and server. Picture this as a two-way street: while clients can send requests, servers can push updates back to clients instantly, without waiting for a new request.
Why Use WebSockets for Real-time Communication?
The adoption of WebSockets for real-time communication is a game changer in various applications, particularly those that demand instant updates, such as messaging platforms, live notifications, and collaborative tools. Here’s why developers love WebSockets:
- Low Latency: WebSockets significantly reduce latency, leading to nearly instantaneous data transfer.
- Reduced Server Load: By using a single persistent connection instead of opening multiple connections, WebSockets minimize the overhead on servers.
- Bidirectional Communication: They allow both the client and server to send messages independently, enhancing interactivity.
For example, consider an online gaming application where players need to see each other’s positions in real-time. WebSockets facilitate this seamless communication, making gameplay enjoyable without lag.
In a world that relies on fast and effective communication, learning how to use WebSockets for real-time communication with JavaScript opens the door to creating dynamic experiences that captivate users’ attention. Our blog, TECHFACK, aims to provide insights into this vibrant technology as we delve deeper into getting started with WebSockets.
.jpg)
Getting Started with WebSockets
Setting Up WebSockets in JavaScript
Now that the foundation has been laid regarding what WebSockets are and their significance, it’s time to dive into the technicalities of setting them up in JavaScript. A WebSocket is incredibly simple to implement, requiring only a few lines of code. The first step is to instantiate a new WebSocket object by initializing it with the server’s URL that supports WebSockets.
Here’s a quick snippet that showcases the process:
const socket = new WebSocket('wss://yourserver.com/socket');In this line, ‘wss://’ indicates that the connection is secure and essential for maintaining the integrity of the data exchanged.
Establishing a WebSocket Connection
Once the WebSocket is created, the next step is to establish an actual connection. This is where event listeners come into play, allowing us to respond to different events in the connection cycle:
- Open: Triggered when the connection is successfully established.
- Message: Fired when the server sends a message to the client.
- Close: Indicates that the connection has been closed, either intentionally or due to an error.
Here’s an example of how to do this:
socket.addEventListener('open', function (event) {

    console.log('Connected to the WebSocket server!');

});

socket.addEventListener('message', function (event) {

    console.log('Message from server ', event.data);

});
This basic setup not only ensures that you are connected but also allows you to receive messages from the server, fostering real-time interaction. As developers embark on using WebSockets for real-time communication with JavaScript, mastering these essential steps becomes crucial. Each connection opens new possibilities for creating engaging, interactive applications, a goal that TECHFACK is dedicated to helping its readers achieve.

Real-time Communication with WebSockets
Sending and Receiving Data
Having established a WebSocket connection, the next exciting step is to send and receive data. This real-time data exchange is the crux of WebSocket’s functionality, and its implementation is straightforward. To send a message to the server, you can simply use the send() method, as shown below:
socket.send('Hello, Server!');This command sends a string message through the WebSocket. On the other hand, receiving messages from the server is equally seamless. As previously mentioned, the message event is crucial. Here’s how it typically looks:
socket.addEventListener('message', function (event) {

    console.log('Received data: ' + event.data);

});
This snippet listens for incoming messages and logs them to the console, thus enabling real-time updates. Imagine using this in a chat application; every time a user sends a message, all participants receive it instantly, which is essential for engaging user interactions.
Handling WebSocket Events
To create robust applications, it’s vital to handle multiple WebSocket events effectively. Beyond open and message, WebSockets also provide events like error and close, which help manage connection states gracefully.
- Error Event: Captures any issues that arise during communication.
- Close Event: Lets you know when the connection has terminated, allowing for proper cleanup.
Here’s a simple example of error handling:
socket.addEventListener('error', function (event) {

    console.error('WebSocket error observed:', event);

});
By employing these event listeners, developers can ensure a smooth experience for users, avoiding disruptions. Embracing these practices will enable developers to fully leverage how to use WebSockets for real-time communication with JavaScript, leading to dynamic, user-friendly applications. As TECHFACK continues to explore this technology, readers will gain the insights necessary to innovate in their projects.
Advanced Features and Use Cases
Broadcasting Messages to Multiple Clients
As developers become familiar with the basic functionalities of WebSockets, they can explore advanced features such as broadcasting messages to multiple clients. This capability is particularly useful in applications like chat rooms, online games, or collaborative tools.
To implement broadcasting, the server typically manages all connected clients and relays messages to each one. For instance, if User A sends a message, the server captures that message, and subsequently, it broadcasts it to all connected users. Here’s a simplified example:
// On the server

wsServer.on('connection', function(socket) {

    socket.on('message', function(message) {

        // Broadcast to all connected clients

        wsServer.clients.forEach(function(client) {

            if (client.readyState === WebSocket.OPEN) {

                client.send(message);

            }

        });

    });

});
This functionality ensures every participant receives real-time updates, thereby enhancing engagement and interactivity.
Securing WebSockets with Authentication
While real-time communication is exciting, it’s equally essential to focus on security, especially in applications that handle sensitive information. Securing WebSockets with authentication is crucial to prevent unauthorized access to the communications channel.
Here are some common strategies:
- Token-Based Authentication: Use tokens to authenticate users when establishing a WebSocket connection. This can be done through JWT (JSON Web Tokens).
- Secure Connections: Always use
wss://for secure WebSocket connections, which utilize SSL/TLS encryption to protect data during transmission.
Here’s a simple implementation of token-based authentication:
const socket = new WebSocket('wss://yourserver.com/socket?token=yourAuthToken');By integrating these security measures, developers can build trustworthy applications that prioritize user data safety. As developers at TECHFACK explore these advanced features, they can unlock the true potential of WebSockets for collaborative, engaging, and secure real-time applications.
Implementing WebSockets in a Project
Integrating WebSockets into a Chat Application
Integrating WebSockets into a chat application offers a powerful way to facilitate real-time communication among users. The architecture typically involves a server that constantly listens for incoming messages and relays them to all connected clients.
To kick off a simple chat application, the setup would look something like this:
- Server-Side WebSocket Implementation: A Node.js server can handle WebSocket connections. The server listens for messages and broadcasts them to all users, as previously shared.
const WebSocket = require('ws');

const wss = new WebSocket.Server({ port: 8080 });

wss.on('connection', (ws) => {

    ws.on('message', (message) => {

        wss.clients.forEach((client) => {

            if (client.readyState === WebSocket.OPEN) {

                client.send(message);

            }

        });

    });

});- Client-Side Interaction: Simply create a front-end application where users can type and send messages, receiving live updates as they do.
This straightforward integration allows users to communicate fluidly, maintaining an engaging experience through real-time interactions.
Troubleshooting Common WebSocket Issues
While WebSockets empower applications with real-time capabilities, developers may encounter certain challenges. Common issues include connectivity problems, unexpected closure of the WebSocket, or latency delays. Here’s how to address these challenges:
- Connection Issues: Ensure that the server is correctly configured to accept WebSocket connections and that clients are pointing to the right URL.
- Unexpected Closure: Handle the
closeevent to identify why connections might drop. Consider implementing automatic reconnection logic in the client.
socket.addEventListener('close', function(event) {

    console.log('WebSocket closed. Attempting to reconnect...');

    // Implement reconnection logic here

});- Monitoring Latency: Use built-in WebSocket events to measure response times and optimize performance.
By focusing on these troubleshooting strategies, developers can enhance the user experience in their projects. At TECHFACK, we believe that mastering these implementations will unlock the true potential of WebSockets in creating engaging, real-time applications for various needs.
