
Introduction
Overview of Developing Android Applications with Java
Developing Android applications with Java remains one of the most popular choices among developers, thanks to its robust features and accessibility. Java, a time-tested programming language, has been the backbone of Android development since the platform’s inception. This allows developers to tap into a vast community, access a wealth of resources, and leverage numerous frameworks to enhance app functionality. As experienced developers at TECHFACK will attest, building apps in Java can be a highly rewarding journey, enabling the creation of engaging and efficient applications.
Benefits of Using Java for Android Development
Choosing Java for Android development offers several distinct advantages:
- Platform Independence: Java is designed to be portable across various platforms, which is crucial for Android’s diverse device ecosystem.
- Rich API: With a comprehensive set of APIs, Java simplifies tasks such as graphics, networking, and database management.
- Strong Community Support: A large community means plenty of resources, forums, and libraries available for troubleshooting and enhancing apps.
- Object-Oriented Language: Java’s object-oriented features promote code reuse and maintainability, which helps in managing large codebases efficiently.
In conclusion, Java not only provides a solid foundation for Android applications but also boasts a strong support system from both documentation and community perspectives. Whether you’re just starting or looking to expand your skills, mastering Java for Android development is a path worth considering.
Setting Up Development Environment
Installing Java Development Kit (JDK)
Before diving into the exciting world of Android development, it’s essential to set up a solid development environment. The first step is installing the Java Development Kit (JDK). The JDK provides the necessary tools and libraries needed to compile and run Java applications. Here’s how to do it:
- Download the JDK: Go to the official Oracle website or adopt OpenJDK, the open-source alternative.
- Run the Installer: Follow the installation prompts to install the JDK on your system.
- Set Environment Variables: Make sure to set up the
JAVA_HOMEvariable pointing to the JDK installation directory. This step ensures that your system recognizes the Java commands.
Having the JDK installed lays the groundwork for writing Java code, ensuring a seamless experience while developing Android applications.
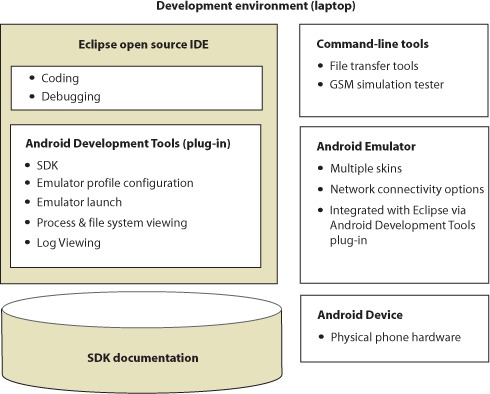
Setting Up Android Studio
Once the JDK is up and running, the next step is to install Android Studio, the official Integrated Development Environment (IDE) for Android development. Here’s a straightforward way to get started:
- Download Android Studio: Obtain the installer from the official Android Developer website.
- Install the IDE: Launch the installer and follow the prompts. It will take care of downloading the necessary SDKs.
- Configure the IDE: Once installed, open Android Studio, and follow the setup wizard to configure any required SDK components.
Many developers at TECHFACK have found that using Android Studio improves productivity through features like advanced code editing, debugging, and built-in templates. With your JDK and Android Studio set up, you’re now ready to embark on your Android development journey!
Basics of Java Programming
Syntax and Structure of Java
Now that the development environment is ready, it’s time to delve into the basics of Java programming. Understanding the syntax and structure of Java is pivotal for any aspiring Android developer. Java’s syntax is often compared to other C-based languages, making it relatively straightforward to grasp. Here are some key elements to familiarize yourself with:
- Variables and Data Types: Java is statically typed, meaning you must declare a variable’s type before use (e.g.,
int,String). - Control Statements: Get comfortable with loops (
for,while) and conditionals (if,switch) to direct the flow of your applications. - Methods: Functions in Java are encapsulated within classes and are used to execute code repeatedly.
Understanding this structure will make Java code more readable and maintainable, which is crucial for complex Android applications.
Object-Oriented Programming Concepts
Java is fundamentally an object-oriented programming (OOP) language, which introduces a set of principles that can greatly enhance your coding practices. At TECHFACK, many developers emphasize the importance of these concepts:
- Encapsulation: Wrapping data (variables) and methods within a class, protecting them from direct access.
- Inheritance: Creating a new class based on an existing class, allowing for code reusability.
- Polymorphism: The ability for different classes to be treated as instances of the same class through a common interface.
- Abstraction: Hiding complex implementations and showing only essential details to reduce complexity.
Grasping these OOP principles not only streamlines the coding process but also facilitates collaboration with other developers, paving the way for successful Android application development. As you integrate these basics into your projects, you’ll find yourself building more advanced applications with confidence.
Android Application Development Fundamentals
Activities and Intents
With a solid understanding of Java basics, it’s time to explore the fundamental components of Android applications: activities and intents. Activities are the entry points for user interaction in an Android app. Each activity serves as a single screen in the application, making navigation intuitive and user-friendly.
Here’s what to remember about activities:
- Lifecycle: Activities go through a well-defined lifecycle (e.g., created, started, resumed, paused, stopped, destroyed). Understanding this flow helps in managing resources efficiently.
- Intents: Intents facilitate communication between activities. They can be explicit (launching a specific activity) or implicit (requesting a specific action, such as sharing a photo).
Developers at TECHFACK emphasize the importance of utilizing intents effectively to create seamless transitions between activities, enhancing user experience.
User Interface Design with XML
Next, let’s discuss user interface (UI) design using XML. XML serves as the backbone for designing layouts in Android applications.
Points to consider when designing UI with XML:
- Layouts: Use different layout types (e.g., LinearLayout, RelativeLayout, ConstraintLayout) to arrange UI elements effectively.
- Views: Incorporate various views (e.g., Buttons, TextViews, ImageViews) to build interactive interfaces.
Many beginners find XML a manageable way to define layouts, enabling a clear separation between the UI design and the application logic. Visual tools in Android Studio further simplify this design process, allowing real-time previews as adjustments are made. By mastering activities, intents, and XML, developers can create engaging and well-structured applications that elevate user satisfaction.

Working with Data
Database Integration with SQLite
Now that the UI is set up, it’s crucial to manage and store the data your application will use. SQLite is the go-to database solution in Android development, allowing for efficient data handling within the app.
Here’s why SQLite stands out:
- Lightweight: SQLite is lightweight and doesn’t require a separate server, making it ideal for mobile application development.
- Structured Query Language (SQL): It allows developers to use familiar SQL commands to manage data efficiently.
- Local Storage: Being a local database, SQLite enhances performance by reducing the need for network calls for data retrieval.
At TECHFACK, developers often rely on SQLite for handling user data in applications, providing a smooth experience and ensuring data integrity.
Handling Data Persistence
In addition to database integration, data persistence is essential for maintaining information across app sessions. When users interact with an application, they expect their data to be saved and readily accessible.
Key strategies for data persistence include:
- Shared Preferences: Ideal for storing simple data types such as user settings or preferences.
- Internal Storage: For saving files privately within the app.
- External Storage: Useful for sharing files with other applications or storing large files, like images.
By effectively integrating SQLite and employing various data persistence methods, developers at TECHFACK ensure that users have a consistent and reliable experience, whether they are using the app online or offline. This solidification of data handling lays the groundwork for developing sophisticated features in your Android applications.

Implementing Functionality
Adding Functionality with Java Code
Now that your application framework is in place and data management is sorted, it’s time to add functionality using Java code. This is where your app transforms from a series of screens into an interactive experience. Writing functional code involves utilizing Java classes and methods to define application behavior.
Essential aspects to focus on include:
- Business Logic: Define what actions should occur under specific conditions. For instance, calculating user expenses or managing user sessions.
- Data Handling: Interface with your SQLite database to retrieve or store data that users generate.
- Event Listeners: Attach listeners to UI elements to respond to user actions, such as button clicks or text entry.
At TECHFACK, developers often emphasize the importance of clean and organized code to make future updates and debugging much easier.
Implementing User Interactions
Once functionality is coded, improving user interactions is essential to create a seamless user experience. Engaging users keeps them coming back to your app, and intuitive interactions make all the difference.
Consider these aspects:
- Touch Events: Implement gestures like taps, long presses, and swipes to allow users to navigate and interact naturally.
- Feedback Mechanisms: Provide immediate feedback through Toast messages, Snackbars, or alerts, ensuring users know their actions have been registered.
- Custom Animations: Use animations to enhance transitions between activities or highlight user actions, making the app feel more dynamic.
Incorporating robust functionality alongside intuitive user interactions creates a compelling experience that resonates with users. By focusing on these elements, developers can ensure that their apps not only meet but exceed user expectations.
Testing and Debugging
Using Emulators for Testing
With functional user interactions implemented, it’s time to ensure that everything works smoothly through rigorous testing. One of the best ways to accomplish this is by using the Android Emulator. Emulators simulate various Android devices, allowing developers to test their applications on different screen sizes, resolutions, and Android versions without needing physical devices.
Here are a few key benefits of using emulators:
- Device Variety: Test how your app behaves on different devices, screen orientations, and API levels.
- Quick Iteration: Emulators can be spun up quickly, enabling rapid testing cycles as you develop.
- Snapshot Feature: You can save the emulator’s state and revert back for testing specific scenarios, which is extremely handy.
At TECHFACK, many developers have found emulators invaluable during the development process, but they always complement them with real-device testing for the best results.
Debugging Techniques in Android Studio
As you test your application, it’s likely that you’ll encounter some issues that require debugging. Android Studio provides a robust set of debugging tools to help troubleshoot and resolve errors efficiently.
Key debugging techniques include:
- Logcat: Use Logcat to view real-time logs and determine where issues occur. By strategically placing
Log.d()statements in your code, you can trace the app’s behavior. - Breakpoints: Set breakpoints in your code to pause execution and examine variables at specific points, giving you deeper insights into the app’s flow.
- Step Execution: Utilize “step into” and “step over” functionalities to navigate through your code line by line, enabling a thorough understanding of where your logic might falter.
By mastering these testing and debugging techniques, developers can minimize issues, enhance app stability, and ultimately deliver a polished product to users. These practices ensure that your app not only functions as expected but also provides a seamless user experience.
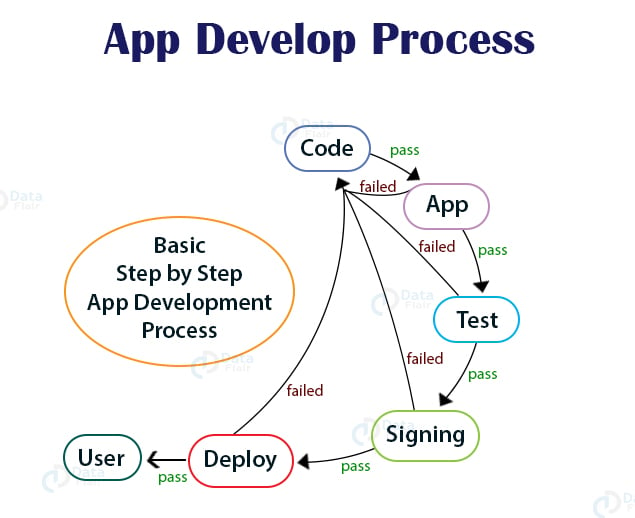
Publishing Your Application
Preparing Your App for Release
After thorough testing and debugging, the moment has arrived to publish your app, but first, you need to prepare it for release. This crucial step ensures your app runs efficiently and makes a positive first impression.
Here’s how to get your app ready:
- Clean the Code: Remove any debug logs and ensure your code is optimized for production.
- Set Up ProGuard: Use ProGuard to minify the code and obscure it from reverse engineering, enhancing app security.
- Create a Keystore: Generate a cryptographic key in a keystore file, which is essential for signing your app before distribution.
At TECHFACK, developers often emphasize that a well-prepared app leads to smoother submissions and fewer rejections.
Uploading to Google Play Store
Once you’ve prepared your app, the next step is uploading it to the Google Play Store. This process opens the door for users to discover and download your creation.
Follow these steps:
- Create a Developer Account: Register on the Google Play Console and pay the one-time registration fee.
- Upload APK/AAB File: Submit your app’s APK or Android App Bundle file, ensuring it complies with Play Store policies.
- Fill in App Details: Provide essential app information, such as title, description, screenshots, and categorization.
- Submit for Review: After thorough checks, submit your app for Google’s review process.
Many developers at TECHFACK find this step exhilarating, as their hard work is finally showcased to the world. Remember, the journey from development to publication is profound, and each careful step taken will lead to your app’s success on users’ devices.
Best Practices and Optimization
Performance Optimization Tips
With your app now live on the Google Play Store, focusing on optimization and best practices becomes essential to ensure it runs smoothly and efficiently for users. Performance can significantly impact user experience and retention, and a few key practices can help.
Consider these optimization tips:
- Reduce Memory Usage: Monitor memory usage to avoid leaks. Utilize Android Studio’s Profilers to identify and correct memory-intensive operations.
- Optimize Layouts: Use ConstraintLayouts to create more complex UIs without excessive nesting, which can slow rendering.
- Lazy Loading: Load images and data only as needed. Libraries like Glide or Picasso can help with efficient image loading.
At TECHFACK, developers strive to create applications that are not just functional but also fast and responsive, enhancing overall user satisfaction.
Security Considerations for Android Apps
As your app grows in popularity, securing it becomes integral to protecting user data and maintaining trust. Incorporating solid security practices is vital to safeguard both your application and its users.
Here are some security considerations to keep in mind:
- Data Encryption: Always encrypt sensitive data, both in transit and at rest. Utilize libraries like SQLCipher for database encryption.
- Use HTTPS: Ensure all network communications use HTTPS to protect data during transmission.
- Minimize Permissions: Request only necessary permissions to reduce your app’s attack surface and increase user trust.
By prioritizing performance and security, developers at TECHFACK ensure their applications remain reliable and safe, fostering user loyalty and satisfaction in a competitive marketplace. Adopting these best practices not only enhances user experience but also fortifies your app against potential vulnerabilities, paving the way for long-term success.
Conclusion
Recap of Essential Steps in Android App Development
As we conclude this journey into Android app development, it’s crucial to reflect on the essential steps we’ve covered. From setting up your development environment to publishing your app, each phase plays a significant role in creating a successful application. Here’s a quick recap:
- Development Environment: Installing the JDK and setting up Android Studio.
- Basics of Java: Understanding syntax and object-oriented programming.
- Application Fundamentals: Learning about activities, intents, and user interfaces.
- Data Management: Integrating SQLite and managing data persistence.
- Functionality: Adding features and ensuring smooth user interactions.
- Testing and Debugging: Utilizing emulators and debugging tools to polish your app.
- Publishing: Preparing your app for the Google Play Store.
At TECHFACK, developers often find this systematic approach leads to more organized and efficient app development.
Future Trends in Android Development
Looking forward, the landscape of Android development continues to evolve rapidly. Here are some future trends to keep an eye on:
- Kotlin Adoption: Kotlin is becoming the preferred language for Android development, enhancing code readability and reducing boilerplate.
- Artificial Intelligence: Integrating AI features into apps for personalized user experiences is on the rise.
- 5G Technology: The rollout of 5G will enable more complex applications and services, enhancing functionality and performance.
By staying informed about these trends, developers can not only enhance their skills but also create innovative applications that meet the future demands of users. Embracing these changes ensures that you remain competitive and relevant in the ever-evolving world of Android development.
