
Overview of the Document Object Model (DOM)
Definition of DOM in JavaScript
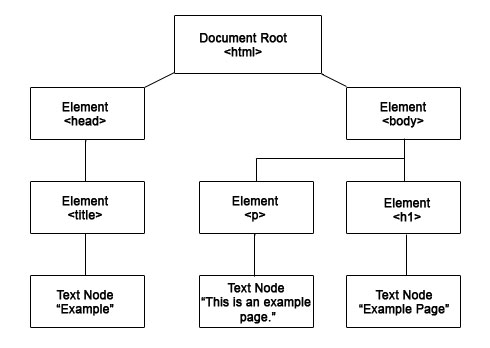
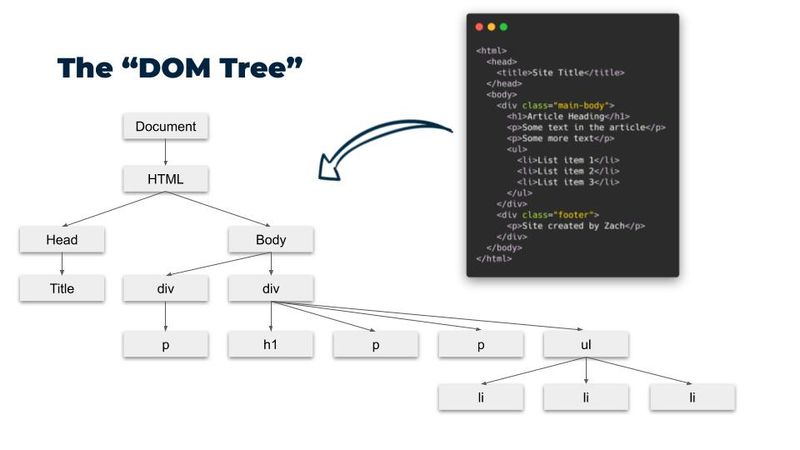
The Document Object Model, or DOM, serves as a representation of a web page structure, allowing developers to interact with HTML and XML documents programmatically. In JavaScript, the DOM presents the document as a tree of objects, where each element corresponds to a node. This hierarchical arrangement provides a straightforward way for developers to access and manipulate the content and structure of a web page using JavaScript.
For instance, if you want to change the text of a header, it can be done easily using the DOM’s methods like getElementById() or querySelector(). This layer of abstraction is what makes dynamic web content possible, enabling rich user experiences.
Importance of Understanding DOM
Understanding the DOM is vital for any web developer, as it forms the backbone for dynamic web applications. This knowledge empowers developers to:
- Manipulate Content: Changing, adding, or removing elements is seamless.
- Enhance User Interaction: Create engaging and responsive designs that adapt to user input.
- Improve Performance: Using the DOM efficiently can lead to faster web applications.
As someone who started learning JavaScript, grasping the DOM made a world of difference. Initially, it felt daunting, but mastering it opened doors to creating interactive sites, much like those I admired. A solid grasp of the DOM is essential for developers aiming to build modern, user-friendly web applications.
DOM Elements and Nodes
Understanding DOM Elements
Building on the previous discussion about the Document Object Model (DOM), it’s essential to dive deeper into what DOM elements are. In simple terms, elements are the individual parts of an HTML document that can be manipulated via JavaScript. Each element—like a <div>, <p>, or <img>—can be uniquely identified and modified using the DOM.
For example, if you have a header element in your HTML, you can use JavaScript to change its content or style dynamically. Imagine you’re creating a blog post and want to highlight a quote. By targeting the specific <blockquote> element through the DOM, you can easily apply a unique style to it without affecting any other part of the document.
Types of Nodes in the DOM
Understanding the different types of nodes in the DOM is crucial for effective manipulation. Here are the primary types:
- Element Nodes: Represent HTML elements (e.g.,
<h1>,<ul>). - Text Nodes: Contain text content within an element (e.g., the actual text of a paragraph).
- Attribute Nodes: Represent the attributes of elements (e.g., class or id).
A personal anecdote: when I first began working with the DOM, I was surprised to learn how text nodes worked beneath the surface. Each visible piece of text on a page is its own node, making text manipulation straightforward—like when changing quotes in a blog or adding descriptions dynamically. Understanding these different node types allows developers to effectively manage and interact with the structure of their pages.

Navigating the DOM Tree
Traversing DOM Elements
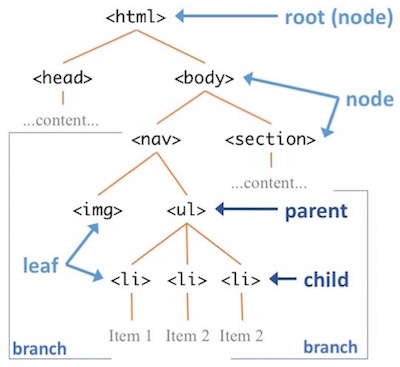
Continuing from the discussion about DOM elements and nodes, navigating the DOM tree is key to manipulating a web page efficiently. Traversing DOM elements means moving through the tree structure created by the DOM to access various nodes. JavaScript offers several built-in methods to facilitate this process, making it incredibly intuitive once you get the hang of it.
For example, the nextSibling and previousSibling properties allow you to move to adjacent nodes, while methods like parentNode and childNodes provide a way to navigate up and down the tree. Picture yourself in an actual tree—each branch leads you to a new part of the structure, and the DOM works similarly!
Accessing Parent and Child Nodes
When working with the DOM, understanding how to access parent and child nodes is fundamental.
- Parent Nodes: This refers to the node directly above another in the hierarchy. For instance, if you have a
<li>element inside a<ul>, the<ul>is the parent node of the<li>. You can access it using theparentNodeproperty. - Child Nodes: These are the nodes directly beneath another node. You can easily get a list of child elements using properties like
childrenorchildNodes.
Reflecting on my early projects, I remember the confusion of trying to manipulate elements without understanding their relationships in the DOM tree. Grasping the concepts of parent and child nodes not only improved my coding skills but also allowed me to create more structured and efficient web applications, a crucial skill for any developer navigating the DOM landscape.
Modifying DOM Elements
Changing Element Attributes
Building on the principles of navigating the DOM, modifying elements is where the real magic happens. One fundamental aspect of this is changing element attributes. Attributes such as src, href, class, and id can have a significant impact on how elements behave and look on a web page. By using JavaScript, developers can dynamically alter these attributes to enhance user interaction and customize content.
For instance, if you’re creating a gallery of images, you can easily change the image source using the setAttribute() method. This would let users see different images without needing to refresh the page. A simple example might look like this:
document.getElementById("myImage").setAttribute("src", "newImage.jpg");This line efficiently updates the source of the image to display something new.
Adding or Removing DOM Nodes
Another critical operation in modifying the DOM involves adding and removing nodes. This flexibility allows developers to create dynamic web applications tailored to user actions.
- Adding Nodes: You can add new elements using methods like
appendChild()orinsertBefore(). For instance, adding a new comment to a blog post can evoke a sense of immediacy for the user. - Removing Nodes: Removal is just as straightforward with methods like
removeChild()or the simplerremove()method. Imagine pruning a garden; it’s about keeping the interface clean and relevant!
Looking back, I vividly remember how liberating it felt to manipulate the DOM dynamically. Creating interactive features, like a real-time comment section, was not only technically satisfying but also immensely engaging for users. Mastering these techniques has been essential for success in developing modern, user-friendly web applications that keep users coming back for more.
Event Handling in the DOM
Introduction to Event Listeners
Transitioning from modifying DOM elements, another vital aspect of working with the DOM is event handling. Event listeners are the backbone of interactive web applications. They allow developers to listen for specific events—like clicks, mouse movements, or keyboard inputs—and respond accordingly. This makes users feel engaged and in control of their experience on a website.
For instance, consider how satisfying it is when you click a button and something changes on the page. Under the hood, an event listener is monitoring that click and triggering an associated function to implement whatever change is needed. You can set up an event listener using the addEventListener() method, allowing you to define what action should occur when a specific event is triggered.
Attaching Events to DOM Elements
Attaching events to DOM elements can be both straightforward and powerful. Here’s how it typically works:
- Using
addEventListener(): This method is used to attach an event handler to a specified element. For example:document.getElementById("myButton").addEventListener("click", function() { alert("Button was clicked!"); }); - Event Types: You can listen for various types of events, such as:
- click
- mouseover
- keydown
Reflecting on my previous projects, I remember the excitement when I first implemented an event listener that opened a modal window when a button was clicked. It felt like I was directly affecting user experience in real-time! Mastering event handling has allowed me to create responsive, interactive applications that keep users engaged, making it an essential skill for any modern developer.

Manipulating Styles with DOM
Changing CSS Properties
Continuing the journey into the DOM, another powerful feature is the ability to manipulate styles directly through JavaScript. This flexibility allows developers to change the appearance of HTML elements dynamically in response to user interactions or other events. By accessing the style property of an element, you can directly modify its CSS properties.
For example, suppose you want to change the background color of a <div> when a button is clicked. You could use the following code:
document.getElementById("myDiv").style.backgroundColor = "blue";With just this one line, the <div> turns blue whenever the user interacts with it! This capability can be leveraged to create visually dynamic pages that respond to user behavior, fostering an engaging user experience.
Adding CSS Classes through JavaScript
In addition to changing individual CSS properties, you can also add or remove entire CSS classes from elements, providing a more organized way to manage styles. The classList property comes in handy for this purpose. Here’s how you might do it:
- Adding a class:
document.getElementById("myDiv").classList.add("highlight"); - Removing a class:
document.getElementById("myDiv").classList.remove("highlight");
Reflecting on my own experiences, I remember the first time I added a “loading” class to an entire section while fetching data. The visual change not only informed users of ongoing processes but also let them know they could expect an update soon. Learning to manipulate styles via the DOM has truly elevated my web development skills, making it easier to craft intuitive and visually appealing applications.
Best Practices for Efficient DOM Manipulation
Avoiding Excessive DOM Manipulation
As we explore the realm of modifying the Document Object Model (DOM), it's essential to adopt best practices to ensure the performance and responsiveness of your web applications. One of the first principles to embrace is avoiding excessive DOM manipulation. Frequent changes to the DOM can be costly in terms of performance because each change can trigger browser reflows and repaints.
To minimize these overheads, consider the following strategies:
- Batch Your Changes: Instead of updating the DOM element by element, gather all changes and implement them at once.
- Use Variables: Store references to elements in variables, so you don’t have to query the DOM repeatedly.
Reflecting on my early projects, I ran into performance issues when I repeatedly manipulated elements inside a loop. After some research, I learned that consolidating those changes drastically improved load times and user experience.
Using Document Fragments for Batch Updates
One effective technique for efficient DOM manipulation is employing Document Fragments. A Document Fragment is a lightweight container that can hold and manipulate DOM nodes without triggering the usual performance costs associated with direct DOM updates.
Here's why Document Fragments are beneficial:
- No Immediate Rendering: Changes made to the fragment do not affect the live DOM until it is appended.
- Efficient Batch Updates: You can build up a structure in memory and append it all at once, vastly improving performance.
An example might look like this:
let fragment = document.createDocumentFragment();

let newElement = document.createElement("div");

newElement.textContent = "Hello, World!";

fragment.appendChild(newElement);

document.body.appendChild(fragment);
This approach can be a game-changer, especially for projects with dynamic content, such as updating lists or galleries. Embracing these best practices not only enhances app performance but creates a smoother experience for all users, reinforcing the importance of efficiency in modern web development.
